Windows 11/10 keeps refreshing
If Windows 11/10 keeps refreshing itself on its own automatically, then here are a few things you need to take a look at: Let us talk about them in detail.
1] Close apps that sync
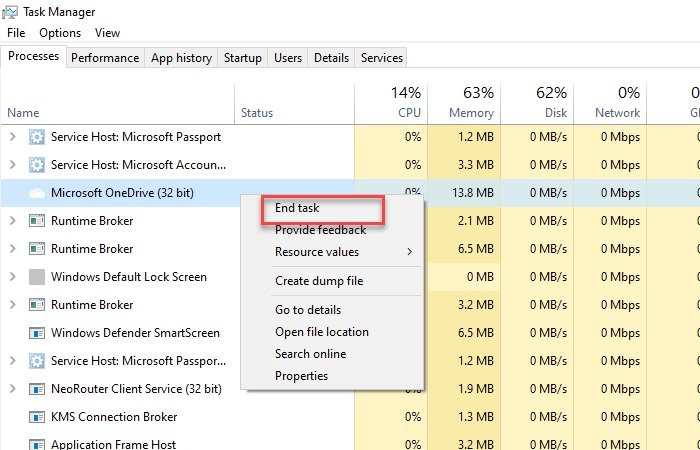
If your computer is refreshing automatically then this can mean that your CPU is having a hard time running all the apps in the background. One such category of apps that puts a lot of pressure on your processor is apps back up your computer’s files onto the cloud. Two of the most common apps for Windows users are OneDrive and iCloud. So, To close these apps, right-click on the taskbar and select Task Manager. Now, right-click on all the cloud apps and select End task. Finally, restart the computer and see.
2] Disable unwanted apps from the Startup list
To disable unwanted apps from the Startup list, launch Task Manager from the Start menu. Go to the Startup tab, right-click on any unwanted app, and select Disable. You need to check the list and disable all the apps that you are not using or don’t want to be launched during startup.
3] Uninstall any recently installed software
This problem can be because of any software that you have installed recently on your computer. Therefore, to fix the issue we are going to uninstall any recently installed software. To do that, hit Win + X > Settings > Apps > search and select recently installed software> Uninstall. Now, restart your computer and see.
4] Check Task Scheduler for tasks that may be running constantly
The next thing we need to do to resolve the issue is to check the Task Scheduler for tasks that are running constantly. To do that, launch Task Scheduler from the Start menu, right-click on Task Scheduler (Local), select Display All Running Tasks. Now, select a task that is constantly running looking (you can identify them by checking the Run Duration) and click End Task. Now, check if the problem persists.
5] Run SFC and DISM Scans
One of the most prominent reasons why your computer is refreshing automatically is the presence of corrupted files. To scan for corrupted files we are going run SFC and DISM scans. To do that, hit Win + S > type cmd > Run as administrator. Now, type the following command and hit Enter. Next, type this command and hit Enter: After this restart your computer once to fix the issue. Read: What does Refresh Desktop or Refresh explorer window actually do?
6] Update or Rollback Display drivers
Another way to fix the Windows 10 keeps refreshing issue is to either update or rollback your Display drivers.
Rollback Display drivers
If you have recently updated your Display drivers then maybe the problem is because of that update. Therefore, we are going to roll back your drivers to fix the issue. To do that, hit Win + X > Device Manager. Now, expand the Display adapters, right-click on your Display drivers, and select Properties. Go to the Driver tab and click Roll Back Driver. If the option is greyed then this means that you are not using an updated version of the drivers. Therefore, you need to update the Display drivers.
Update Display drivers
If you conclude that you are using an outdated driver then updating it can fix the solution. To do that, launch Device Manager and expand Display adapters. Now, right-click on your Display drivers and select Update driver. Now, a wizard will ask you to select either Search Automatically for updated driver software or Browse my computer for driver software. Select the latter if you have already downloaded the updated version, otherwise, choose the former option. Read: How to restart Graphics Driver in Windows 10.
7] Use your PC in High-performance mode
If the above step concludes that you didn’t have corrupted files or outdated drivers then we have to give more power to your CPU. For that, we are going to use your computer in High performance mode. To do that, launch Control Panel by searching out of the Start menu, click Power Options > select High Performance. If you are not able to see the option, select Create a power plan > High performance > Next > Create. Read: Desktop or Explorer does not refresh automatically.
8] Change Display Settings
Another common reason behind this problem as per the report of many victims is slideshow wallpapers. Therefore, if you have selected a slideshow wallpaper removing or altering it can help in fixing the issue. To do that, right-click on your Desktop, select Personalize and change the “Change picture every” option to either 1 or 6 days. This is not for everyone but for the users who use Slideshow Wallpapers.
9] Troubleshoot in Clean Boot State
If none of the above-mentioned solutions resolved the Windows 11/10 keeps refreshing issue then you need to troubleshoot in Clean Boot State. Clean-boot troubleshooting is designed to isolate a performance problem. To perform clean-boot troubleshooting, you must take a number of actions, and then restart the computer after each action. You may need to manually disable one item after another to try and pinpoint the one that is causing the problem. Once you have identified the offender, you can consider removing or disabling it. To do that:
Hit Win + S > type “msconfig” > Enter.From the General tab, tick Local system services and Use original boot configuration, and untick Load startup items. Go to the Services tab and tick Hide all Microsoft services.Finally, click Disable all > Apply > OK and restart your computer.
Now, check if the problem persists in the Clean Boot State. If Windows 10 is not automatically refreshing in the Clean Boot State then this means that you are dealing with a software conflict issue. Now, to narrow down your results, repeat the first 3, enable the first 5 services, and restart the computer. Repeat the steps till you know the exact cause of the issue. Let us know if anything here helped you. TIP: This post will help you if Taskbar & Desktop keeps refreshing with a black screen.